A Guide to Repotting Your Plants: A Step-By-Step Journey to Healthy Growth
When, Why, and How?
Introduction: Exploring the Art of Repotting
Have you ever pondered the intricacies of repotting your cherished plants? Why is it necessary, and when is the ideal time? In this comprehensive article, we unravel the mysteries of repotting, providing you with an easy-to-follow, step-by-step guide. Don't fret; this task is an integral part of plant parenthood, and we're here to ensure you're well-prepared.
As the days grow longer and warmer, our plants awaken from their slumber, stretching their roots in search of nourishment. With the advent of spring, comes the responsibility of repotting. It's time to assess if your plant requires fresh soil or a more spacious abode to accommodate its flourishing growth.
The Essence of Repotting: Why It Matters
Repotting involves giving your plant a larger living space to foster healthy and robust growth. It also offers an opportunity to refresh the nutrients within the soil. The significance of repotting encompasses various aspects:
- Overall Plant Health: Sometimes, your plant outgrows its container, becomes top-heavy, or exhibits signs of declining health, such as stunted growth or root binding.
- Soil Refreshment: Your plant may not need a bigger pot but rather a soil change, as it has depleted the nutrients from its current soil.
- Alternative Medium: Some plants thrive in chunkier soil that aids natural aeration and root development, such as Aroids from the Araceae family.
- Outdoor Transition: When transitioning a plant outdoors, consider repotting if it needs more space to accommodate increased growth due to better light and temperature variations.
- Aesthetic Reasons: Matching decor or decorative pots can also warrant repotting.
- Overwatering Recovery: In cases of overwatering, where roots have rotted, repotting is essential. Remove the plant, discard damp soil, trim rotted roots, and replant it in fresh soil while being cautious with watering.
Plants generally require repotting every 1.5 to 2 years, but specifics vary based on plant size, growth rate, and the time of year. For precise guidelines on your plant's needs, consult our expert horticulturists.
📏As a rule of thumb, younger plants benefit from repotting every 6 months to a year, while older ones require repotting every few years.
Knowing When It's Time to Repot
Recognizing the right time to repot is crucial. Here's how:
Timing Matters: Ideal repotting occurs in early spring, typically March to April. Plants remain dormant during winter, making it less favorable for adjusting to new pots.
Indicators for Repotting:
- Stunted Growth: If your plant displays slow or unhealthy growth, it may require more nutrients or space.
- Top-Heavy: When the top of the plant becomes disproportionately heavy, risking tipping over.
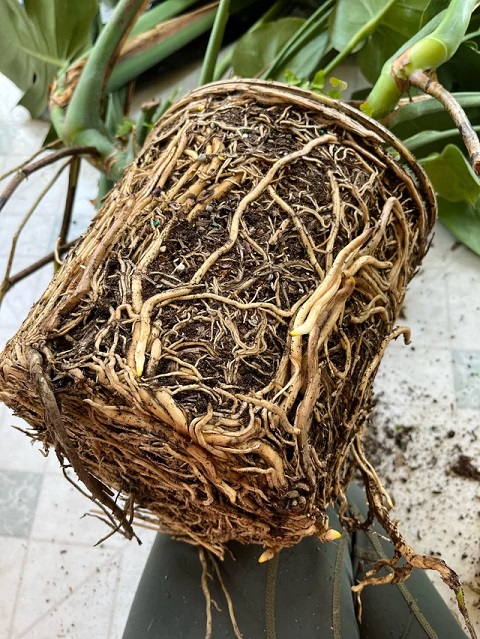
- Root-Bound: Examine the roots; if they've outgrown the pot, or roots protrude from drainage holes, it's time to repot.
- Moisture Issues: If water drains too quickly, or the plant dries out rapidly between waterings, the soil may need rejuvenation.
🚨Avoid immediate repotting when bringing a new plant home, as it's already adapting to its new environment. Give it a few weeks to acclimate before considering repotting.
While repotting is necessary at times, excessive repotting can stress plants. Allow your plant to establish itself, and you'll soon witness vibrant new growth, particularly when performed in early spring.
Now, let's delve into the practical steps of repotting.
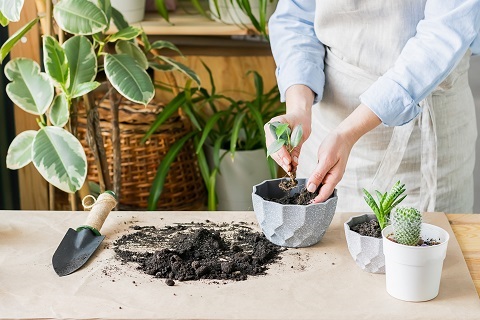
A Step-By-Step Guide to Repotting
Step #1: Plant Preparation
Water your plant in advance to keep the soil and roots intact when removing it from its current pot. Trim any yellowing or withering leaves for a refreshed look.
Step #2: Gather Materials
Ensure you have all necessary items ready: suitable soil, a new pot, a watering can, clean shears or scissors, and gloves. Consider using a gardening mat for easy cleanup.
Step #3: Soil Selection
Standard indoor houseplant soil works well for most plants. Alternatively, opt for succulent soil or a chunkier medium for Aroid plants to improve aeration.
Step #4: Pot Selection
Choose a pot one size larger than the current one (e.g., from a 4" pot to a 6" pot). Ensure proper drainage, either with a pot that has drainage holes or by placing a nursery pot inside a decorative one.
Step #5: Pot Preparation
Line the pot's base with a coffee filter or dryer sheet to prevent soil spillage. Add fresh soil to create space for new roots.
Step #6: Plant Removal
Gently remove the plant by inverting the pot and gently tugging the base. If it's stuck, tap the pot's sides or use a knife to loosen it. Massage the root ball to loosen the roots.
Step #7: Planting
Position your plant upright and centered in the new pot, filling the sides with fresh soil. Avoid packing it too densely to allow root aeration. Tap the pot's sides to settle the soil if using a nursery pot.
Step #8: Water Thoroughly
Water until it drains from the pot's bottom, then discard excess water. Avoid fertilizing immediately to prevent root burn.
Step #9: Light and Placement
Shield your plant from direct sunlight for a few weeks after repotting, as roots are sensitive during this period. Provide bright, indirect light.
Step #10: Enjoy!
Observe your plant flourish in its new home. While it adjusts and focuses on root development initially, be patient, and anticipate vibrant new growth during the warmer months.
Repotting is a rewarding endeavor that promotes your plant's well-being and longevity. With this guide, you're ready to embark on your journey to healthier, happier plants.
Frequently Asked Common Questions:
1. Should you remove old soil when repotting?
Yes, removing old soil during repotting is generally recommended, especially if the plant has been in the same pot for an extended period. Over time, soil can become depleted of nutrients, compacted, and may harbor pests or diseases. By removing old soil, you allow the plant to benefit from fresh, nutrient-rich soil, promoting better growth and overall health.
2. How do you repot a plant for beginners?
Repotting for beginners involves a few key steps:
a. Choose the Right Time: Spring is often the best time for repotting when plants are entering a period of active growth.
b. Select a New Pot: Choose a pot that is 1-2 inches larger in diameter than the current one, with drainage holes.
c. Prepare New Soil: Use a well-draining, high-quality potting mix suitable for your specific type of plant.
d. Gently Remove the Plant: Carefully remove the plant from its current pot, loosening the roots if they are tightly bound.
e. Inspect the Roots: Trim any damaged or rotting roots and check for signs of pests or diseases.
f. Place in New Pot: Position the plant in the center of the new pot and add fresh soil around the sides.
g. Water Thoroughly: Water the plant thoroughly to help settle the soil and hydrate the roots.
3. What not to do when repotting plants?
Avoid these common mistakes when repotting:
a. Using the Wrong Soil: Ensure you use a well-draining potting mix suitable for your plant type.
b. Choosing an Inappropriate Pot: Select a pot with drainage holes to prevent waterlogging.
c. Ignoring Root Health: Check the roots for issues and trim as needed, but avoid excessive root disturbance.
d. Overwatering After Repotting: While the plant needs water, avoid overwatering immediately after repotting to prevent root rot.
e. Skipping Transplant Shock Preparation: Minimize stress by keeping the plant in a shaded area for a few days post-repotting.
4. Should you break up roots when repotting?
It's generally advisable to loosen, but not necessarily break up, roots that have become pot-bound or circling the root ball. Gently tease apart the roots to encourage outward growth, promoting a healthier root system in the new pot. However, avoid aggressive root disturbance, especially for plants sensitive to transplant shock.
5. Should you water a plant right after repotting?
Yes, it's crucial to water the plant after repotting. Water helps settle the soil, removes air pockets, and hydrates the roots. However, avoid excessive watering, as the plant may be more susceptible to root rot during the initial post-repotting period. Allow the soil to dry slightly between watering to strike a balance and promote healthy root development.
6. Do you have to remove all soil when repotting a plant?
While it's not necessary to remove every speck of soil, it's beneficial to remove a significant portion, especially if the soil is old, compacted, or depleted of nutrients. Leaving some existing soil around the roots helps minimize transplant shock. Adding fresh, high-quality potting mix during repotting provides the plant with essential nutrients for optimal growth.